
How To Check Original and Fake Currency
Jun 13, 2024, 10:46 IST
Checking for original and fake currency is crucial to avoid counterfeit money. Here are some common methods to verify the authenticity of currency:
General Tips for All Currencies
- Feel the Texture: Genuine currency typically has a unique texture due to the special paper and printing process. It should feel crisp and slightly rough.
- Inspect the Watermark: Hold the bill up to the light to check for a watermark. The watermark should be visible from both sides and match the portrait or design on the bill.
- Examine the Security Thread: Look for a security thread embedded in the bill. It often runs vertically and may be visible only when held up to the light.
- Check the Printing Quality: Authentic bills have sharp, clear, and detailed printing. Counterfeit bills often have blurry or smudged images and text.
- Look for Color-Shifting Ink: Many modern bills use color-shifting ink, which changes color when the bill is tilted.
- Microprinting: Look for microprinting on the bill, which consists of tiny text that is difficult to replicate. You may need a magnifying glass to see it clearly.
- Serial Numbers: Ensure that the serial numbers are evenly spaced and match in color and style. Counterfeit bills often have irregularities in the serial numbers.
Specific to Indian Rupee (INR)
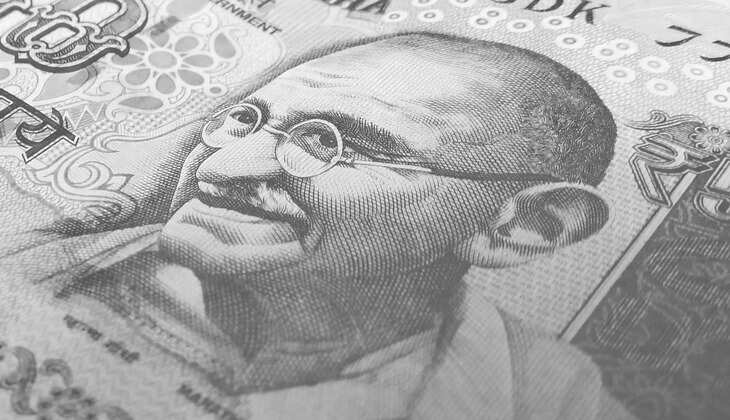
- Mahatma Gandhi Portrait: On the front side of the bill, the portrait of Mahatma Gandhi should be clear and well-defined.
- Security Thread: The security thread on Indian Rupee notes reads "Bharat" (in Hindi) and "RBI" alternately when viewed from different angles.
- Watermark: The watermark consists of a light and shade effect and shows the image of Mahatma Gandhi when held up to the light.
- Latent Image: On the right side of the bill, a vertical band next to the portrait shows the denomination when tilted.
- Intaglio Printing: The front side of the bill has raised printing, which can be felt by running your fingers over the note.
- Identification Mark: A special feature for visually impaired individuals, located on the left of the watermark window, helps identify the denomination.
Specific to US Dollar (USD)
- Portrait and Vignette: The portrait on the front and the vignette (image) on the back should be clear and distinct.
- Federal Reserve and Treasury Seals: The seals on the front should be clear and sharp. The sawtooth points of the Treasury seal should be distinct.
- Serial Numbers: The serial numbers should be evenly spaced and printed in the same ink color as the Treasury seal.
- Color-Shifting Ink: On the $10, $20, $50, and $100 bills, the numeral in the lower right corner shifts from copper to green when tilted.
- 3D Security Ribbon: On the $100 bill, the blue ribbon woven into the paper has images of bells and 100s that move when you tilt the bill.
- Bell in the Inkwell: On the $100 bill, a bell and inkwell symbol to the left of the portrait changes color when viewed from different angles.
Using Technology
- UV Light: Many currencies have features that glow under ultraviolet (UV) light, such as security threads, fibers, or certain inks.
- Magnifying Glass: Use a magnifying glass to inspect microprinting and other small details that are hard to replicate.
- Counterfeit Detection Pens: These pens contain an iodine solution that reacts with starch in wood-based paper, turning dark if the bill is fake. Note that this method is not foolproof as some counterfeiters use starch-free paper.
Awareness and Education
- Stay Updated: Currency designs are periodically updated with new security features. Stay informed about the latest designs and security features of your currency.
- Bank Verification: If you are ever in doubt, take the currency to a bank for verification.
By using these methods, you can effectively identify genuine currency and protect yourself from counterfeit money.